Monday, June 30, 2008

Fine Line Henna Palm - Paste on skin

henna tattoo bridal quality henna tattooAfter browsing through the collection of traditional henna tattoo patterns from India, my client chose this design.

To be sure, this is a modified version of the pattern as we were having henna party at the Midnight Sun. For a private party, please contact the studio by phone or e-mail. Henna is available by walk-in appointment only on Saturdays from 1:00 until 5:00 in Five Points.

Sometimes Spirit Vision Henna offers mehandi at the First Friday party in Five Points at Bead Here Now. The best way to get your henna is to give a call.

Sunday, June 29, 2008

Cajeput Oil & Pomegranate Juice! Great Henna Color

original henna pattern palm of hand red finished colorI used cajeput oil in this mix to get this great finished color only 14 hours off the skin. This is the 2007 crop of Jamila henna giving this good color. The henna paste was allowed to remain on the palm of the hand for about 6 hours.
I was lucky to get this foto before the beach party. I am happy to share it with you.

For those new to Spirit Vision Henna.. this is a "chef's choice" pattern. It is an easy way to get a unique henna tattoo that fits your style & your budget.

Be sure to click the photo for a larger view. Also, to see more henna tattoos visit Spirit Vision on myspace.

Thursday, June 26, 2008

मसाला दुध - Masala Dudh

Masala Dudh in English

Masala dudh, Masala Doodh recipe, Marathi Recipe Masala Dudh, India Tradition, Kojagiri pournima, Desi Recipe, Desi Groceryसाहित्य:
२ कप दुध
३ टेस्पून साखर
मसाल्यासाठी साहित्य:
१/४ कप बदामाची पूड
१ टेस्पून पिस्ता पूड
१/२ टिस्पून वेलचीपूड
चिमूटभर जायफळ पूड
१ चिमूटभर केशर

कृती:
१) मसाला बनवताना न खारवलेले पिस्ता आणि बदाम वापरावेत. त्याची पूड करावी. बदाम पिस्ता पूड, वेलची आणि जायफळ पूड आणि केशर एकत्र मिक्सरवर एकत्र करून घ्यावेत.
२) २ कप दूध गरम करावे. त्यात ३ टेस्पून किंवा आवडीनुसार साखर घालावी. बनवलेला २-३ टिस्पून मसाला घालून ढवळावे. थोडे उकळू द्यावे व गरम गरम सर्व्ह करावे.

टीप:
१) मसाला बनवताना इतरही सुकामेवा आवडीनुसार वापरू शकतो.
२) यामध्ये अख्ख्या चारोळ्याही घालू शकतो.
३) मसाल्यात जायफळ प्रमाणातच वापरावे. कारण मसाला दुधाला जायफळाचा जास्त फ्लेवर आला तर ते उग्र लागते.

Masala Milk

Masala Dudh

Masala dudh, Masala Doodh recipe, Marathi Recipe Masala Dudh, India Tradition, Kojagiri pournima, Desi Recipe, Desi Grocery

Ingredients:
2 Cup Milk
3 Tbsp Sugar
Ingredients for Masala:
¼ cup Almond Powder (unsalted)
1 Tbsp Pistachio Powder (unsalted)
½ tsp Cardamom Powder
Pinch of Nutmeg powder
1 pinch of Saffron

Method:
1) If you have unsalted Almonds and pistachio at home, grind it and use only the amount of measurement given above. Add Almond and Pistachio Powder, Cardamom Powder, Nutmeg powder and Saffron in the mixer and mix all the ingredients very well.
2) In a saucepan, heat 2 cups milk and add 3 tbsp sugar or add as per your requirement. Add 2-3 tsp prepared masala in it and stir with spoon. Bring it to boil.
Serve hot.

Note:
1) You can add other unsalted dry fruits like cashew nuts.
2) You can add Charoli seeds in Masala dudh.
3) Do not add too much of Nutmeg powder. Overwhelming flavor of Nutmeg powder could ruin the taste of Masala Dudh.

Labels:
Masala Dudh, Masaala dudh, Massala Milk, kojagiri, Badam Milk

Tuesday, June 24, 2008

मठ्ठा - Mattha

Mattha Spiced Buttermilk (English Version)

Mattha, Spiced Buttermilk, Maharashtrian Buttermilk, spicy buttermilk, Indian buttermilk recipe, low calorie diet

साहित्य:
१/२ कप दही
१ कप पाणी
१ टेस्पून कोथिंबीर
२ चिरलेली पुदीना पाने
१/४ टिस्पून जिरे
१/४ टिस्पून किसलेले आले
चवीनुसार मिठ

कृती:
१) प्रथम दही रवीने घोटून घ्यावे. मग त्यात पाणी घालून घुसळून घ्यावे.
२) खलबत्त्यात घालून जिरे भरडसर कुटून घ्यावे. कुटलेले जिरे आणि किसलेले आले, घुसळलेल्या ताकात घालावे.
३) एका वाटीत १ टेस्पून बारीक चिरलेली कोथिंबीर आणि चिरलेली पुदीना पाने घ्यावीत. त्यात २ चिमटी मिठ घालून कुस्करून घ्यावे, म्हणजे मठ्ठा पिताना त्याची पाने तोंडात येणार नाहीत. हि कुस्करलेली कोथिंबीर व पुदीना पाने मठ्ठ्यात घालावी. चवीनुसार मिठ वाढवावे.
सर्व एकत्र ढवळून जेवणानंतर सर्व्ह करावे.

टीप:
१) किंचीत तिखटपणा हवा असेल तर अगदी चिमूटभर मिरचीची पेस्ट घालावी.

Labels:
Spiced Buttermilk, buttermilk recipes, Mattha recipe, how to make Mattha

Spiced Buttermilk Mattha

Mattha in Marathi

Ingredients:
½ cup Plain Yogurt
1 cup water
1 tbsp chopped Cilantro
2 Mint leaves
¼ tsp Cumin Seeds
¼ tsp ginger, minced
Salt to taste


Mattha, Spiced Buttermilk, Maharashtrian Buttermilk, spicy buttermilk, Indian buttermilk recipe, low calorie diet

Method:
1) In a container, add yogurt and whisk for a minute. Make yogurt very smooth. Add water and make buttermilk.
2) Crush Cumin Seeds coarsely. Add Crushed Cumin seeds, Ginger to buttermilk.
3) In a small bowl, add chopped cilantro, mint leaves and little salt. Crush together until Cilantro and mint leaves become mushy. Add it to Buttermilk. Add little salt and mix.
Serve after any meal.

Note:
1) Add approx. ¼ tsp chili paste to give nice chili flavor.

Labels:
Spiced Buttermilk, Buttermilk recipes, Mattha recipe, how to make mattha


Monday, June 23, 2008

Kissing Fish Henna Tattoo - Henna by Ann George

kissing fish henna tattoo

Here is a great tattoo pattern from the collection of Catherine Cartwright-Jones, rendered as best as possible by yours truely, Ann George... aspiring henna artist.

This tattoo was chosen for its meaning as well the visual beauty of the design.

These two fancy goldfish are kissing in a little spray of bubbles. I love the flowing detail of their fins and tails. This is a great tattoo for a Pisces woman. I used a liquid paste & fine tip on the plastic cone to make this design possible.

If you are new to henna tattoo and are trying to find some great patterns to share with your customers, please be sure to visit Tap Dancing Lizard! The Sangeet book is a favorite!

You may notice a little bit of color that seems to be running from the tattoo. This is just the lemon sugar glaze dripping a bit. Be sure, I dabbed up the excess with a cotton swab before my client left. The lemon sugar glaze helps the henna stay on the skin! The longer the henna stays & the warmer the client is.. the darker the finished color.

Friday, June 20, 2008

Quick Henna Tattoo - Peacock Pattern for Back of Hand

henna peacock tattoo finished color

Many thanks to Ron & Rachel for this foto of the finished color of a henna tattoo design inspired by the little henna booklets I received from India.

Of course this design is not as intricate as the one in the photo, but we were having "First Friday in Five Points" so everyone got a little something. On Saturday afternoons at Midnight Sun I usually have a bit more time to spend with everyone. If you want a more complex design, it is best to arrive @ 1:30 ... before the late afternoon rush.

I always bring plenty of patterns for you to choose from, or you can order "Chef's Choice" which may be the best way to get a quick henna tattoo that fits your style & your budget.

Thursday, June 19, 2008

शंकरपाळे - Shankarpale

Shankarpale (English Version)

shankarpale, god, shankarpari, shakarpari, diwali faral, diwali faral recipe, diwali sweets, diwali festival, diwali india
साहित्य:
१/४ कप दूध
१/४ कप तूप
१/४ कप साखर
साधारण दिड कप मैदा

कृती:
१) दूध, तूप आणि साखर एकत्र करून साखर वितळेपर्यंत गॅसवर गरम करावे. हे मिश्रण थंड करून घ्यावे.
२) मिश्रण थंड झाल्यावर त्यात मैदा घालून मळावे. भिजवलेला मैदा एकदम घट्ट किंवा एकदम सैल मळू नये. मध्यमसर मळावे. मळलेले पिठ २० मिनीटे झाकून ठेवावे.
३) २० मिनीटांनंतर पिठ परत एकदा मळून घ्यावे. २ इंचाचा एक गोळा करून थोडा मैदा भुरभुरवून लाटावे. कातणाने त्याचे शंकरपाळे पाडावेत. आणि तूपात किंवा तेलात सोनेरी रंगावर तळून काढावेत.

Labels:
Shankarpale, shakarpari, Diwali Faral, Maharashtrian Diwali Faral, shakarpali

Shankarpale

Shankarpale

shankarpale, god, shankarpari, shakarpari, diwali faral, diwali faral recipe, diwali sweets, diwali festival, diwali indiaIngredients:
¼ cup Milk
¼ cup Pure Ghee
¼ cup Sugar
Approximately 1 & ½ cup Maida (All purpose Flour)
Oil or Ghee for deep frying


M
ethod:

1) In a saucepan, add Milk, Sugar and Ghee. Heat the mixture until sugar melts. Remove from the heat and let it cool down.
2) Add Maida to mixture, and knead to medium consistency dough. Cover the dough for 20 minutes. Do not add entire amount of Maida. Add little by little, so that it you will get perfect consistency.
3) After 20 minutes, knead it again. Divide into 2 inch round balls. Sprinkle little dry Maida Flour on your work surface and roll out dough ball to round and thin tortilla.
Cut it into diamond shape and deep fry in oil or Pure ghee.

Labels:
Shankarpale, shakarpari, Diwali Faral, Maharashtrian Diwali Faral recipe, Diwali Festival

Wednesday, June 18, 2008

Moroccan henna in Morocco mehndi body art tattoos

I learned so much about mixing a good paste from this video. Now, my henna is much more liquid, is easier to apply quickly, and give a deeper color as it dries more slowly. Thanks to this fine artist, my work is much improved.

Tuesday, June 17, 2008

कोबीची भजी - Kobichi Bhaji

Kobi Pakoda (English Version)

gobi pakora, kobi bhuji, gobhi pakora recipe, gobhi recipe, quick and easy, kobichee recipe, recipy

साहित्य:
३/४ कप बारीक चिरलेली कोबी
१/४ कप बारीक चिरलेली भोपळी मिरची
४ टेस्पून बेसन
१ टेस्पून कॉर्न स्टार्च किंवा कॉर्न फ्लोअर
२ हिरव्या मिरच्या
३ लसणीच्या पाकळ्या
१ टिस्पून जिरे
१/२ टिस्पून हिंग
१ टिस्पून हळद
१ टिस्पून लाल तिखट
१/४ कप कोथिंबीर, बारीक चिरून
चवीपुरते मिठ
तळण्यासाठी तेल

कृती:
१) प्रथम चिरलेली कोबी आणि भोपळी मिरची एका वाडग्यात एकत्र करावे. त्याला थोडे मिठ चोळावे ज्यामुळे भाज्यांना थोडे पाणी सुटेल.
२) मिरच्या आणि लसणीच्या पाकळ्या मिक्सरवर वाटून घ्याव्यात. किंवा मिरचीची आणि लसणीची पेस्ट उपलब्ध असेल तर ती वापरावी.
३) मिठ लावलेल्या भाज्यांमध्ये वर दिलेले सर्व साहित्य घालून मिक्स करावे. अगदी थोडे पाणी घालून कांदा भजीला भिजवतो तितपत घट्टसर भिजवावे.
४) तेल गरम करून भिजवलेल्या पिठाची लहान लहान बोंडं तळून घ्यावीत. भजी तळताना मध्यम आचेवर तळावीत नाहीतर भजी आतमध्ये कच्ची राहण्याचा संभव असतो.

Labels:
bhajee, bhajji, Bonda, Gobhi Pakoda, kobiche wade, kobi wade, pakora recipe, gobi pakora recipe

Cabbage Pakora

Gobi pakoda in Marathi

Ingredients:
¾ cup finely chopped Cabbage
¼ cup finely chopped Bell Pepper
4 tbsp Besan (Chickpea Flour)
1 tbsp Corn Starch / Corn Flour
2 green Chilies
3 Garlic Cloves
1 tsp Cumin seeds
½ tsp Asafoetida Powder
1 tsp Turmeric Powder
1 tsp Red Chili Powder
¼ cup finely chopped Cilantro
Salt to taste
Oil for deep-frying

gobi pakora, kobi bhuji, gobhi pakora recipe, gobhi recipe, quick and easy, kobichee recipe, recipy

Method:
1) Mix Cabbage and Bell pepper in a bowl. Rub little salt to it.
2) Grind green chilies and Garlic cloves together. Alternatively, if available, you can use green chili paste and garlic paste.
3) Put all the ingredients with the vegetables and mix very well. Add very little water. Consistency of mixture should be as thick as we keep for Onion Pakoda.
4) Heat enough oil for deep-frying. Drop small balls of mixture into heated oil. Deep fry pakodas on medium high heat, if you fry it on high heat, it will become crispy outside but remains uncooked inside.

Serve pakodas hot with green chutney or tomato ketchup.

Labels:
Bhajee, Bhajji, Bonda, Gobhi Pakoda, Kobiche wade, Kobi wade, Pakora recipe, gobi pakora recipe.

Monday, June 16, 2008

थाई पाककला आणि सर्च इंजिन

Thai Recipe Search Engine (English Version)


थाई जेवण हा माझा आवडीचा प्रकार. त्यात वापरलेले मसाले, त्यातून तयार होणारे रंग आणि झणझणीत चव यामुळे थाई, आपल्या जवळच्या (म्हणजे भारतीय) चवीचे जेवण वाटते.माझे थाई पदार्थ शिकण्याचे प्रयत्न चालू असतात. तेव्हा मी शोधलेल्या वेबसाईट्सचे सर्च इंजिन बनवावे असे डोक्यात आले. साधारण ५० थाई साईट्स/ ब्लॉगचे हे सर्च इंजिन साहित्याप्रमाणे (Ingredients) रिझल्ट्स देते.


थाई पदार्थ हे नॉनवेजकरीता जास्त फेमस आहेत तरीही थाई पदार्थांमध्ये खुप विवीधता आहे. छान सूप्स आहेत, गोड पदार्थ आहेत. पपई, आंबा, केळी, नारळ वापरून बनवलेल्या भाज्या, गोड पदार्थ आणि वेगवेगळे फ्राईड राईस आहेत, अशी बरीच विवीधता आहे.

तुम्हाला थाई पदार्थांविषयी जाणून घ्यायचे असेल तर हि सर्च इंजिनची लिंक
थाई रेसिपी सर्च इंजिन

काही खास थाई शाकाहारी रेसिपीज

टोफू कोकोनट करी
ग्रिल्ड वेजिटेबल्स
थाई मुळा आणि काकडीचे सलाड
थाई मँगो अँड स्टिकी राईस

Saturday, June 14, 2008

Henna Pattern Booklets from India - Ready to Ship

arabic heena designs booklet from india

I have just uploaded the first five of the newly arrived henna tattoo pattern booklets from India! I have two of each style at the moment. If I sell out of a booklet you want, I will offer a selection of five more to choose from.

These henna design booklets contain traditional patterns for hands and feet. They are 4.5" x 6.75" with a colorful cover and contain 25 henna patterns. They are printed on a soft gray paper, and some offer recipes in English. Most are written in a language I can't read or speak, but the patterns are great.

I always take at least three traditional pattern books to events so that Western customers can get an idea of the art in its "pure" form.

To purchase, booklets are $4.95 USD each, click the title of this post to go to Spirit Vision Henna Tattoo. Secure shopping by PayPal. Free Shipping in the USA.

Thursday, June 12, 2008

Henna Pattern Books - Artist's Picks

Bridal Henna Tattoo for Brooke - Original Henna Pattern

bridal henna tattoo

Brook designed this unique henna tattoo for her wedding day as we went along. I was very lucky to feel pretty good about drawing trees so that I felt pretty well qualified to help design the pattern for her.

She sent me some samples by email of styles she liked. As well, she looked through some of the pattern books I brought to our appointment before deciding on an asymmetrical tree design. The patterns she had sent me had a Turkish feeling which I tried to include in the style of the leaves, and the spacing of the lines.

The backs of the hands were done very simply, again with an asymmetric design offering an Arabic look. The pattern she chose for the feet was a traditional "sandal" style that mirrored the organic feeling of the palm pattern.

I hope to be able to post photos of the finished color for you soon. 'Til then, just click the image for a close up.

कॅबेज सलाड - Cabbage Salad

Cabbage Apple Salad (English Version)


chinese salad, cabbage sala, Chinese Cabbage  Salad, healthy recipe, healthy salad recipe, weight target
साहित्य:
दिड कप पातळ चिरलेली कोबी
१/२ कप लाल सफरचंदाच्या फोडी
१/४ कप बारीक चिरलेला पाती कांदा
१/२ टिस्पून किसलेले आले
२ टेस्पून भाजलेले शेंगदाणे
१/२ टिस्पून सोया सॉस
१/२ टिस्पून व्हिनेगर
१ टेस्पून साखर
१ टेस्पून बारीक चिरलेली कोथिंबीर
१ टिस्पून किंचीत भाजलेले तिळ
१/४ टिस्पून सुक्या लाल मिरचीचा चुरा (ऑप्शनल)

chinese salad, cabbage sala, Chinese Cabbage  Salad, healthy recipe, healthy salad recipe, weight target
कृती:
१) सफरचंद आधी कापून ठेवू नये. सर्वात आधी पुढीलप्रमाणे मिश्रण करून घ्यावे : १/२ टिस्पून सोया सॉस, १/२ टिस्पून व्हिनेगर, १ टेस्पून साखर, १/२ टिस्पून किसलेले आले सर्व एकत्र करून साखर विरघळेस्तोवर मिक्स करावे.
२) भाजलेल्या शेंगदाण्याची साले काढून टाकावीत. त्याची अगदी पावडर करून नये, फक्त थोडे कुटून घ्यावे.
३) एका भांड्यात पातळ कापलेली कोबी घ्यावी. सफरचंदाचे तुकडे करावेत. सफरचंदाच्या फोडींमध्ये वरील मिश्रण मिक्स करावे, आणि कोबीमध्ये मिक्स करावे.
४) वरून भाजलेले तिळ, कोथिंबीर, कुटलेले शेंगदाणे, पाती कांदा आणि लाल मिरच्यांचा चुरा घालून सलाड सजवावे.

टीप:
१) सलाडसाठी कोवळी कोबी घ्यावी तसेच आतून करकरीत असलेले लालबुंद सफरचंद घ्यावे.
२) यामध्ये मिठ घालायची गरज नसते पण जर गरज असल्यास चिमूटभर मिठ घालावे.
३) हे सलाड आयत्यावेळी बनवावे, कारण सफरचंद आधीच कापून ठेवले तर ते काळे पडेल. म्हणून क्रमांक १ मध्ये दाखवलेले मिश्रण आधीच बनवून फ्रिजमध्ये ठेवून द्यावे.

Labels:
Cabbage salad, Apple salad, Salad Recipe, healthy salad recipe

Cabbage Apple Salad

Cabbage Apple Salad in Marathi

chinese salad, cabbage sala, Chinese Cabbage  Salad, healthy recipe, healthy salad recipe, weight target

Ingredients:
1½ cup thinly sliced Cabbage
½ cup Red crisp Apple cubes
¼ cup finely chopped Green Onion
½ tsp grated ginger
2 tbsp roasted peanuts
½ tsp Soy Sauce
½ tsp Vinegar
1 tbsp Sugar
1 tbsp finely chopped Cilantro
1 tsp lightly roasted Sesame seeds
¼ tsp Crushed red pepper (optional)


chinese salad, cabbage sala, Chinese Cabbage  Salad, healthy recipe, healthy salad recipe, weight target
Method:
1) Mix Soy Sauce, Vinegar, sugar and grated ginger together.
2) Peel roasted peanuts and crush them coarsely.
3) In a mixing bowl, take sliced cabbage. Cut Red Apple into cubes and put into mixing bowl. Pour the mixture we have prepared in step 1. Mix all gently.
4) Garnish with roasted Sesame Seeds, Cilantro, coarsely crushed Peanuts, Green onion, and Crushed Red chili.

Note:
1) Select fresh Cabbage and Red Apple.
2) In this salad, there is no need to add salt. However, if you want you can add pinch of salt in salad.
3) Cut apple a minute before serving salad. If you keep the apple cubes ready, it will turn apple color to brown.

Labels:
Cabbage salad, Apple salad, Salad Recipe, healthy salad recipe

Tuesday, June 10, 2008

चिली पनीर - Chilli Paneer

Paneer Chili (English Version)
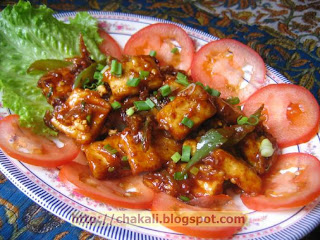
Paneer recipe, chili paneer, starters recipe, chinese paneer starter recipe, indian grocery, food, spicy chili paneer
साहित्य:
१५० ग्राम पनीर
६-७ सुक्या लाल मिरच्या
पनीर तळण्यासाठी तेल
१ टेस्पून आले पेस्ट
१ टेस्पून लसूण पेस्ट
१ टेस्पून टोमॅटो पेस्ट
१/२ कप बारीक उभा चिरलेला कांदा
१/४ कप उभी चिरलेली भोपळी मिरची
१/४ कप बारीक चिरलेला पाती कांदा
२ टेस्पून कॉर्न स्टार्च किंवा कॉर्न फ्लोअर (टीप २)
२ टीस्पून सोया सॉस
१ टिस्पून व्हिनेगर
मिठ
१/२ टिस्पून साखर
१/२ टिस्पून मिरपूड

Paneer recipe, chili paneer, starters recipe, chinese paneer starter recipe, indian grocery, food, spicy chili paneer
कृती:
::::चिली सॉस::::
१) सुक्या लाल मिरच्या तोडून घ्याव्यात. लहान पातेल्यात पाउण कप पाणी गरम करावे, त्यात तोडलेल्या मिरच्या घालाव्यात. २ मिनीटे उकळावे. गॅस बंद करून पातेल्यावर झाकण ठेवून द्यावे. मिरच्या नरम झाल्या कि त्यातील पाणी एका वाटीत काढून ठेवावे. मिरच्यांची मिक्सरवर पेस्ट करून घ्यावी. टोमॅटो पेस्ट आणि मिरच्यांची पेस्ट एकत्र करावी. १ टेस्पून तेलावर हि पेस्ट १ मिनीटभर परतून घ्यावी. नंतर दुसर्‍या भांड्यात काढून ठेवावी.

::::पनीर::::
१) पनीरचे १ इंचाचे चौकोनी तुकडे करून घ्यावे. एका वाडग्यात मिठ, १/२ टिस्पून मिरपूड आणि केलेल्या आलेलसणीच्या पेस्टपैकी एकेक चिमटी पेस्ट घालून असे मिश्रण करून घ्यावे. हे मिश्रण पनीरच्या तुकड्यांना हलक्या हाताने लावावे.
२) कॉर्न फ्लोअर एका बोलमध्ये घेऊन त्यात ४-५ चमचे पाणी घेऊन मध्यमसर पेस्ट बनवून घ्यावी. एकीकडे तळण्यासाठी तेल गरम करावे. जरा छोटी कढई वापरावी म्हणजे तेल कमी वापरले जाईल. पनीरचे मिठ, मिरपूड आणि आलेलसूण लावलेले तुकडे कॉर्न फ्लोअरच्या पेस्टमध्ये बुडवून सोनेरी रंग येईस्तोवर तळून काढावे. पेपर टॉवेलवर काढून ठेवावे.
३) उरलेल्या कॉर्न फ्लोअरच्या पेस्टमधील १ चमचा पेस्ट आणि मिरच्यांचे १/२ कप पाणी एकत्र करावे.

::::चिली पनीर::::
१) पनीरचे तळलेले तुकडे, आणि परतलेली मिरची-टोमॅटो पेस्ट तयार ठेवावी. नॉनस्टीक फ्राईंग पॅनमध्ये २-३ टिस्पून तेल तापवावे. आलेलसूण पेस्ट परतावी, कांदा परतावा. कांदा पूर्ण परतू नये. नंतर भोपळी मिरची परतावी. तयार केलेला चिली सॉस घालून परतावे. व्हिनेगर आणि सोया सॉस घालावा. मिरच्यांचे पाणी आणि कॉर्न फ्लोअरची पेस्ट एकत्र केलेले मिश्रण घालावे. १/२ टिस्पून साखर घालावी. मिश्रण जरा आटू द्यावे, आटले कि तळलेले पनीर घालावे. निट मिक्स करावे. बारीक केलेला पाती कांदा वरून भुरभुरावा. गरम गरम सर्व्ह करावे.

टीप:
१) पनीरला कॉर्न फ्लोअरचे कोटिंग करताना पेस्ट खूप दाट असू नये. पातळसरच असावे.
२) पनीर चिली बनवताना कॉर्न फ्लोअर किंवा कॉर्न स्टार्च यापैकी आपण काहीही वापरू शकता.

Labels:
paneer chili, paneer recipe, Chili paneer, chilli paneer, Starters recipe

Paneer Chili

Paneer chili

Paneer recipe, chili paneer, starters recipe, chinese paneer starter recipe, indian grocery, food, spicy chili paneer

Ingredients:
150 Gram Paneer
6-7 Dry Red Chilies
Oil for Deep Frying
1 tbsp Ginger Paste
1 tbsp Garlic Paste
1 tbsp Tomato paste
½ cup thinly sliced Onion
¼ cup thinly sliced Bell pepper
¼ cup finely chopped Green onion
2 tbsp Corn Starch or Corn Flour
2 tsp Soy Sauce
1 tsp White Vinegar
Salt to taste
½ tsp Sugar
½ tsp Black pepper powder

Paneer recipe, chili paneer, starters recipe, chinese paneer starter recipe, indian grocery, food, spicy chili paneerMethod:
::::Chili Sauce::::
1) Boil ¾-cup water in a saucepan. Break Dry red chilies and put it into boiling water. Boil for 2 minutes, turn off the heat and cover the saucepan with lid. It will make chilies little soft. Keep it cover for 10 minutes. Drain and reserve the chili water. Grind chilies to fine paste.
2) Mix Tomato paste and chili paste together. In a saucepan, heat 1 tbsp oil, stir this mixture for a minute, and transfer this paste to another bowl. This is our Chili Sauce.

::::Paneer::::
1) Cut Paneer into 1-inch cubes. In a bowl, add little salt, ½ tsp Black Pepper Powder, 1 pinch each out of 1 tbsp Garlic paste and Ginger paste. Mix all this ingredients very well. Marinate Paneer cubes gently with this mixture.
2) In other bowl, add 1 tbsp corn flour/ Corn Starch and 5-6 tsp water, make thin consistency paste. Heat enough oil for deep-frying. Use small nonstick deep fryer, which will give us, required depth for deep-frying by using less amount of oil. Dip marinated Paneer pieces into Corn flour paste, and deep-fry these pieces till color turns to golden. Fry 2-3 pieces at a time. Do not fry longer; it could affect the taste of Paneer. Transfer fried pieces to Paper towel and remove extra oil.
3) Mix reserved Chili water and 1 tbsp remaining Corn flour paste together.

::::Chili Paneer::::
1) Heat 2-3 tsp oil in a nonstick frying pan. Add remaining ginger-garlic paste and sliced onion and sauté. Once onion is half cooked, add sliced bell pepper and sauté. Do not cook bell pepper completely. Add chili sauce, which we have prepared in 1st step. Add Soy sauce, Vinegar, Sugar and mixture of Chili water and Corn Flour paste. Let the mixture become little thick. Once mixture becomes thick, add fried Paneer Pieces and mix gently. Cook for a minute. Garnish with Chopped green onion and Serve hot as starter.

Note:
1) While coating Paneer with Corn Flour paste, be careful about the consistency of the paste. It should not be thick. It will affect the taste. We want very thin coating of Corn flour paste on Paneer.

Labels:
paneer chili, paneer recipe, Chili paneer, chilli paneer, Starters recipe

Monday, June 9, 2008

Impromptu Butterfly Henna Tattoo

henna butterfly tattoobutterfly henna tattoo

Here are photos of a butterfly tattoo garden I did on Saturday. My client really enjoys floral designs & free style henna, so I am able to try new patterns.

The first photo shows the design on the inner wrist. The second photo shows the design as it moves from the inner wrist to the outer arm. In this way, there is a little bit of henna pattern visible, but the main pattern is "hidden". I am still working to perfect my butterfly skills, and hope to post more fotos in the future.

To see larger images, just click the photos. For more henna tattoos for the arms, visit Spirit Vision Henna.

Saturday, June 7, 2008

Tribal Henna Tattoos from Midnight Sun

henna tattoo tribal stylepattern by catherine cartwright-jonestribal henna tattoo

Here are three little photos of tribal style henna tattoo people ordered at the Midnight Sun on Saturday June 7, 2008. The henna patterns for the back of the hands are derived from traditional components from African patterns.

The bold snake & bird tattoo is a favorite of one of my favorite customers! This pattern is made possible for her by the generosity of Catherine Cartwright-Jones who has published so many patterns for henna artists to use! Just click the little photos for a larger view.

Photos by Ann George Studios, Inc. and Spirit Vision Henna. All rights reserved.

Friday, June 6, 2008

Henna at Bead Here Now! Five Points Block Party

henna tattoo for top of foot - original henna design

Spirit Vision Henna is happy to be invited to offer henna tattoo tonight, Friday June6, 2008 at fabulous Bead Here Now for the Five Points Block Party.

This is a good time to come by & get a little henna on the hands, wrists or arms. Party settings often require that you pay a bit more attention to keep your henna smudge free until it's dry.

Of course if you want a lovely tattoo for the foot - the evening is a good time. The design to the left really requires that you leave barefoot. If you want to keep enjoying the block party, a foot tattoo may not be your best choice. Perhaps the ankle?

Bead Here Now is located at 1051 Park Street, Riverside, Jacksonville Florida.

Thursday, June 5, 2008

आमसूल चटणी - Amsool Chatani

Amsool Chutney (English Version)

Kokum chutney, chutney recipe, Spicy Chutney Recipe, Amsool Recipe, healthy reicpe, diet food recipe, Indian Grocery

साहित्य:
५-६ आमसुलं
आमसुल गोळ्याच्या दुप्पट गूळ
३-४ मिरच्या
जिरं
मीठ

कृती:
१) आमसुलं १५-२० मिनीटे पाव वाटी गरम पाण्यात भिजत ठेवावीत. किंवा आमसुलाचे सार करून झाल्यावर उरलेली आमसुलं वापरावीत.
२) भिजवलेली आमसुलं, गूळ, मिरच्या, जिरं, मिठ एकत्र करून मिक्सरमध्ये वाटून घ्यावी.

Labels:
amsool chutney, amsoolachi chutney, Kokum Chutney

Amsool Chutney

Amsool Chutney

Ingredients:
5-6 Kokum (Amsool)
2 tbsp Jaggery
3-4 green chilies
1 tsp Cumin Seeds
Salt to taste

Kokum chutney, chutney recipe, Spicy Chutney Recipe, Amsool Recipe, healthy reicpe, diet food recipe, Indian Grocery
Method:
1) Soak kokum in 1/4 cup hot water for atleast 15-20 minutes. Squeeze Kokum in that water. Drain and reserve the water for making Amsool saar.
2) Grind kokum, jaggery, Green Chilies, Cumin seeds and salt together. Kokum Chutney is ready.

Labels:
Amsool chutney, amsoolachi chutney, Kokum Chutney

Wednesday, June 4, 2008

Kanji Henna Tattoo for Men

henna tattoo for men kanji henna

Many thanks for this finished color photo of a Kanji henna tattoo on the wrist. Kanji is an excellent choice for men as it presents a tribal look and brings the advantage of a personal or spiritual meaning.

While Kanji is often applied to the upper arm, I find it best to put spiritually significant Kanji over the pulse point on the wrist. For those of you new to pulse point therapy, the idea is to put power symbols over areas where the blood is close to the surface of the body, and where the pulse is easily felt. The purpose is that when the blood passes under the image it is blessed by, or attuned to the meaning of the symbol.

This particular design had a personal meaning created by the combination of two symbols. I bring a small book of Kanji with me to every party or event, and you are welcome to choose one, or to bring your own. Please be sure to visit the "New American Tribal" tattoo gallery on line at Spirit Vision Henna for more ideas.

Tuesday, June 3, 2008

आमसुलाचे सार - Amsool Saar

Amsool Saar (English version)

आमसुल पित्तशामक, पाचक तसेच भूक वाढवणारे असते. म्हणून आमसुलाचे सार जेवणाच्या आधी सूप म्हणूनही पिता येते.
आजारपणात आमसुलाचं सार प्यायल्याने तोंडाला चव येते.

konkani recipe, amsool sar, kokum kadhi, indian recipe, kokum grocery, indian store grocery and foods
वाढणी: साधारण २ कप

साहित्य
:

५-६ आमसुलं
२ टिस्पून गूळ
१ टिस्पून तूप
१/४ टिस्पून जिरे
चिमूटभर हिंग
१ हिरवी मिरची बारीक चिरून
१ टेस्पून चिरलेली कोथिंबीर
दोन कप पाणी
चवीनुसार मिठ

कृती:
१) आमसुलं १/२ कप गरम पाण्यात १ तासभर भिजत घालावीत. नंतर आमसुलं त्या पाण्यात कुस्करून घ्यावी, म्हणजे आमसुलाचा अर्क पाण्यात उतरेल. हे पाणी गाळून घ्यावे। उरलेली आमसुले टाकून देऊ नयेत, त्या आमसुलांची चटणी बनवता येते.
२) या आमसुलाच्या पाण्यात दिड-दोन कप पाणी वाढवावे आणि पातेल्यात घेऊन गरम करत ठेवावे. छोट्या कढल्यात १ टिस्पून तूप गरम करावे. त्यात जिरे, हिंग, मिरचीची फोडणी करावी. हि फोडणी, गरम करत ठेवलेल्या आमसुलाच्या पाण्यात घालावी. मिठ घालावे. २ टिस्पून गूळ घालावा. कोथिंबीर घालून थोडे गरम करून गरम गरम सर्व्ह करावे.

Labels:
Kokum Saar, Amsool sar, kokum, kokum curry, kokum kadhi, kokum recipe, Maharashtrian Recipe

Amsool saar

Amsool saar

Servings : approx. 2 cups

Ingredients:
5-6 Amsool
2 tsp Jaggery
1 tsp pure ghee
¼ tsp Cumin Seeds
Pinch of Asafoetida powder
1 green chili, finely chopped
1 tbsp finely chopped Cilantro
2 cups water
Salt to taste

konkani recipe, amsool sar, kokum kadhi, indian recipe, kokum grocery, indian store grocery and foods
Method:
1) Soak 5-6 Amsool in half-cup water for 1 hour. After one hour, squeeze all Amsool in the water and reserve the squeezed Amsool to make Amsool Chutney.
2) Heat a saucepan. Add ½-cup Amsool flavored water and 1½ to 2 cup more water in that saucepan.
3) Take another small saucepan. Heat 1 tsp Ghee in it. Temper ghee with Cumin seeds, Asafoetida powder, and chopped green chili. Put this Tadka in Amsool water. Add salt to taste and 2 tsp Jaggery. Heat the amsool water. Garnish with chopped cilantro and serve hot as soup.

Labels:
Kokum Saar, Amsool Sar, Kokum, Kokum Curry, Kokum Kadhi, Kokum Recipe, Maharashtrian Recipe

Monday, June 2, 2008

Henna Peacock for the Ankle

henna tattoo peacock design

Here is a quick henna tattoo for the ankle. As you can see from the photos, there is still a gentle trace of a floral henna pattern in place on the foot... so we used that as the ground for the peacock pattern.

I do use a heavier line for tattoos on the ankle.. I find this gives a bold look that lasts well... and is easy to see.

If you are hoping to give henna a try, but haven't made it to Midnight Sun on Saturdays, I will be a "Bead Here Now" on Friday June 6, 2008 at 6:00PM.

A pattern like this takes about five minutes and costs about $10. I will bring lots of pattern books to choose from.