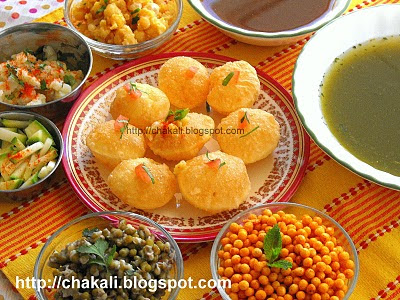
Stuffing For Pani Puri in Englishइतर संबंधित पाककृती:पाणीपुरीच्या पुर्यापाणीपुरीचे पाणी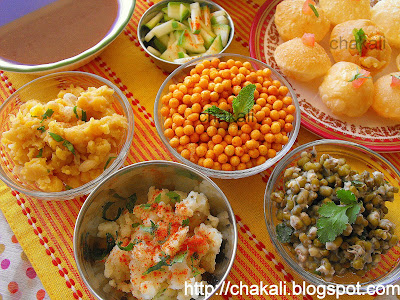 पाणीपुरीचे फिलिंग - १साहित्य:
३/४ कप हिरवे मूग
चिमूटभर हळद (ऐच्छिक)
चवीपुरते मिठ
कृती:१) मूग ८ ते ९ तास कोमट पाण्यात भिजवावेत. त्यांना मोड काढून ते शिजवून घ्यावे. शिजवताना थोडे मिठ घालावे
टीप: शिजवताना चिमुटभर हळद घालावी. त्याने मूगाचा उग्रपणा कमी होतो तसेच रंगही येतो.
पाणीपुरीचे फिलिंग - २साहित्य:३/४ कप पांढरे वाटाणे
चिमूटभर हळद,
चवीपुरते मीठ
कृती:पांढरे वाटाणे ५ ते ६ तास कोमट पाण्यात भिजवावेत. ते मऊ शिजवून घ्यावे. शिजवताना थोडे मिठ घालावे.
टीप: शिजवताना चिमुटभर हळद घालावी. त्याने मूगाचा उग्रपणा कमी होतो तसेच रंगही येतो.
पाणीपुरीचे फिलिंग - ३साहित्य:३/४ कप हिरवे मूग
१ शिजवलेला बटाटा
चाट मसाला
मीठ
कृती:मूग वरील कृतीप्रमाणे मोड आणून शिजवून घ्यावे. शिजवलेला बटाटा निट कुस्करून घ्यावा. त्यात शिजलेले मूग घालावे, चवीपुरते मिठ आणि चाट मसाला घालावा.
पाणीपुरी फिलिंग - ४साहित्य:२ उकडलेले बटाटे
१/२ टिस्पून भाजलेले जिरे, कुटून
चवीपुरते मिठ
चिमूटभर लाल तिखट
१ टेस्पून कोथिंबीर, बारीक चिरून
कृती:१) बटाटे सोलून कुस्करून घ्या. त्यात कुटलेले जिरे आणि मिठ घालून मिक्स करा.
२) एका मध्यम वाडग्यामध्ये हे मिश्रण काढून त्यावर लाल तिखट आणि कोथिंबीर पेरून सजवा.
टीप: लाल रंगाचे बटाटे (रेड पोटॅटो) वापरू नयेत. लाल बटाटे कुस्करल्यावर त्यांना चिकटपणा असतो.
पाणीपुरी फिलिंग - ५साहित्य:१/२ कप खारी बुंदी किंवा मसाला बुंदी
कृती:पुरीला भोक पाडून त्यात १ टीस्पून बुंदी भरावी त्यात तिखट-गोड पाणी भरून पाणीपुरी खावी.
अजून एक आयडिया म्हणजे तिखट पाण्यात बुंदी घालावी त्यामुळे बुंदी फुलेल. तिखट पाणी आणि फुगलेली बुंदी पुरीत भरावी आणि खावी.
पाणीपुरी फिलिंग - ६साहित्य:१/४ कप कैरीचे बारीक काप
चिमूटभर मिठ
चिमूटभर लाल तिखट
कृती:कैरीच्या कापांवर लाल तिखट आणि मिठ पेरावे आणि वरील कोणत्याही स्टफिंग बरोबर पाणीपुरीत भरून खावे.
Labels:
Pani Puri, Puchka, golgappa, panipuri recipe