Saturday, May 31, 2008

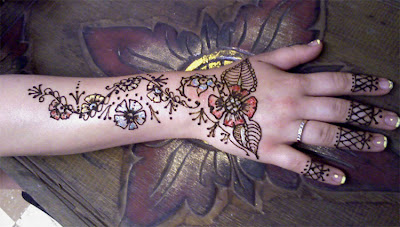
Gilded Henna Tattoo - simple & elegant

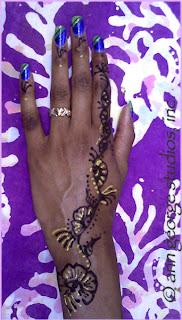
gilded henna tattoo for women of color

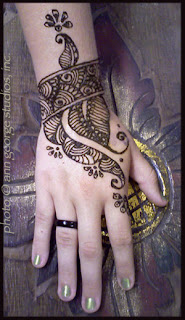
Here is an example of the exotic beauty possible with just a bit of gilding added to your design. We started with a simple, flowing floral pattern, not too busy, not too bold, and then, once it was dry, added a bit of golden gilding to highlight the tattoo.

Notice how the golden color compliments the clients hand!! as well as her nails. This gilding paste was made with a stiff setting gel & some fine golden (jewel tone) cosmetic powder from a good costume shop.

You may want to click the photo to enlarge it for a better view. It is possible to see the tiny spots of gold added to the pattern at the tip of the finger. This was a "chef's choice" pattern, and I am sure you can see it is a popular floral motif, modified to fit the clients hand.

Gilding pastes come in a variety of colors... but it is important to know that they will only last for the day. When you take your henna paste off, the gilding comes away, and unlike the henna, there is no dye left after the paste is removed. For those of you new to henna tattoo, the dark paste you see is NOT black henna, but a photo of the tattoo with the paste still on the skin.

Thursday, May 29, 2008

Jamial Henna Powder on Sale

jamila henna powder on sale

Enjoy free shipping in the USA for the last of the 2007 henna powder I have on hand. Each 100 gram box provides enough henna powder for 5 or 6 cones of paste and they are on sale for $6.00 each.

i am still having good results with the 2007 harvest: super sifted powder, fine lines, dark color on palms, backs of hands and legs.

The next shipment will arrive sometime in July if all goes as planned. Click the title of this post to go to the shopping cart section of my henna site.

I also hope to be able to offer Yemeni henna this year. I will have a sample in the Studio mid June to test. Look for the 2008 crop of Jamila Henna to arrive mid July.

मिनी उत्तप्पा - Mini Uttappa

Mini Uthappa (English Version)

uthappa recipe, Uttappa recipe, South Indian Uthappa, Onion Uthappa, Masala Uthappa

साहित्य:
१/२ कप उडीद डाळ
सव्वा ते दिड कप तांदूळ
चवीपुरते मिठ
१ कांदा
१ टोमॅटो
१ टीस्पून मिरचीचा ठेचा (ऑप्शनल)
कोथिंबीर
१/२ वाटी तेल

कृती:
१) तांदूळ आणि उडीद डाळ पाण्यात साधारण ७-८ तास भिजत घालावे. नंतर मिक्सरमध्ये थोडे बारीक वाटून घ्यावे. मिश्रण एकदम पातळ किंवा घट्टं नसावे. मध्यमसरच वाटावे, त्यानुसार वाटताना पाणी घालावे. मिक्सरमध्ये डाळ व तांदूळ वाटताना १ चमचाभर मिठ घालावे.
२) वाटलेले मिश्रण आंबवण्यासाठी उबदार ठिकाणी किमान १०-१२ तास झाकून ठेवावे. जर वातावरण खुप थंड असेल तर ओव्हन २-३ मिनीटे प्रिहीट करून बंद करावा व मिश्रण झाकून ओव्हनमध्ये ठेवावे. तेवढ्या उबेवर पिठ आंबते. आवश्यकतेनुसार आंबवलेल्या पिठात मिठ घालावे.
३) पिठ आंबले कि कांदा पातळ आणि उभा चिरावा. कांद्याला थोडे मिठ चोळून घ्यावे. टोमॅटो बारीक चिरून घ्यावा.
४) नॉनस्टीक तवा गरम करावा. १/२ चमचा तेल घालावे. आंबवलेल्या पिठापैकी १ डाव पिठ तव्यावर घालून थोडे जाडसर पसरवावे. त्यावर चिरलेला कांदा, टोमॅटो, कोथिंबीर आणि आवडत असल्यास किंचीत मिरचीचा ठेचा लावावा.
५) मध्यम आचेवर तव्यावर झाकण ठेवून थोडी वाफ काढावी. एक बाजू शिजली कि सावकाशपणे कालथ्याने बाजू पलटावी कारण वरच्या बाजूवर आपण कांदा टोमॅटो घातले आहेत. दुसरी बाजू शिजू द्यावी. गरम गरम मिनी उत्तपा, सांबार आणि चटणीबरोबर सर्व्ह करावे.


टीप:
१) मसाला डोसा बनवताना जी बटाट्याची भाजी करतो ती भाजी, उत्तप्प्यावर कांदा टोमॅटो घालून एक वाफ काढली कि पसरवावी आणि हि बाजू शेकवावी. हा मसाला उत्तप्पाही मस्त लागतो.

Labels:
Mini Uttappa, Onion Uttappa, Tomato Uthappa, South Indian Recipe, Onion Tomato Uthappa

Mini Uthappa

Mini Uttappa in Marathi

Ingredients:
½ cup Urad Dal
1¼ to 1½ cup Rice
Salt to taste
1 Onion, sliced thinly and lengthwise
1 Tomato, finely chopped
1 tsp Green chili paste
Cilantro finely chopped
¼-cup oil


uthappa recipe, Uttappa recipe, South Indian Uthappa, Onion Uthappa, Masala Uthappa

Method:
1) Soak rice and Urad Dal together in water for 7-8 hours. After 7-8 hours, drain water. Put Urad dal and rice into grinder. Add little water and grind to smooth paste. Add 1 tsp salt while grinding. This mixture should be of medium consistency.
2) Place ground mixture to warm place at least for 10-12 hours for fermentation. Cover the mixture container with lid. If climate is cold, it could slow down fermentation process. In that case, preheat oven for 2-3 minutes and switch off the oven. Put mixture container with lid in the oven. This will keep mixture warm and it will help to ferment mixture. After 10-12 hours, when mixture is fermented, add little salt if needed.
3) Once mixture is ready, take sliced onion into bowl and rub little salt to it.
4) Heat nonstick tawa, grease with ½ tsp oil, pour around 1/3 cup batter and spread in round shape to little thick layer. Sprinkle onion, tomato and chopped cilantro. Spread little green chili paste if you like the chili taste with Uthappa.
5) On medium heat Cover tawa with lid and let the Uthappa cook on steam. Once one side is done, turn the side and let it cook for couple more minutes. Serve hot Mini Uthappa with Sambar and Chutney.

Note:
1) To make Masala Uthappa, spread Potato stuffing (which we generally make for Masala Dosa) along with Onion and Tomato. Spread it to one side of Uthappa, keep this side down, and cook Uthappa for 1 minute. Serve hot with Chutney.

Labels:
Mini Uttappa, Onion Uttappa, Tomato Uthappa, South Indian Recipe, Onion Tomato Uthappa

Wednesday, May 28, 2008

Bridal Henna for the Palm - A 35 Minute Design

bridal henna tattoo palm tattoo

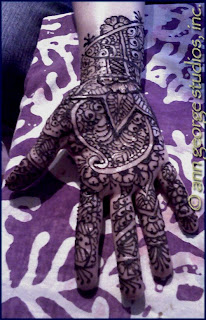
Here is a photo of a traditional henna tattoo for the palm. The design is a synthesis of traditional India henna style and a touch of the bold Arabic fashion.

After viewing the work of many fine artists, and benefiting from some videos, I made a thinner paste than usual and used a mylar cone to create this tattoo.

With a thin paste (almost like tempra paint texture) and a very fine tip on the cone, I was able to do more intricate mehandi much faster than ever before.

I started at the top most portion of the wrist, marked out the primary design areas first, then filled those in with finer lines.

I followed the same process for the hand... which is how I achieved the reverse image paisley on the palm.

The dark centers of the flowers that surround the paisley help set it off. Each finger is different, which gives a spontaneous look to my eye. I will post the foot tattoo pattern tomorrow.

Tuesday, May 27, 2008

पावभाजी बाईट्स - Pavbhaji Bytes

Pavbhaji Bites (English Version)

pavbhaji bites, target, pavbhaji recipe, pav bhaji snacks, leftover pavbhaji, bhaji pav, mumbai street food, instast snackसाहित्य:
८ फ्रेंच ब्रेडचे तुकडे (Image) (१ इंचाचे)
(हा ब्रेड वरून कडक आणि आतमध्ये नरम असतो.)
१ कप पावभाजीची भाजी
किसलेले चिज
चिरलेली कोथिंबीर

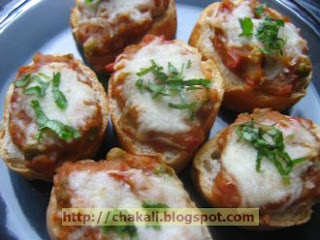
१) फ्रेंच ब्रेडचे तुकडे एका डब्यात भरून ठेवावेत. डब्याचे झाकण थोडे उघडे ठेवावे जेणेकरून ब्रेड थोडा कडक होईल. pavbhaji bites, target, pavbhaji recipe, pav bhaji snacks, leftover pavbhaji, bhaji pav, mumbai street food, instast snack
२) ब्रेडच्या तुकड्यावर एक ते दिड चमचा पावभाजी पसरावी. त्यावर थोडे किसलेले चीज घालावे.
३) ३५० F वर ओव्हन प्रिहीट करावे. हे ब्रेडचे तुकडे १०-१२ मिनीटे किंवा चिज वितळेपर्यंत बेक करावे. सर्व्ह करताना थोडी कोथिंबीर पेरावी.
हे पावभाजी बाईट्स चहाच्या वेळी स्नॅक म्हणून खायला छान लागतात.

Labels:
pavbhaji bites, Spicy Snacks, pavbhaji recipe, bhaji pav recipe, leftover recipe, party snacks, pavbhaji snacks, mumbai pavbhaji

Pavbhaji Bites

Pavbhaji Bites in Marathi

Ingredients:
8 French Bread Pieces (1 Inch)
1 Cup Pavbhaji
Shredded Cheese
Chopped Cilantro for garnishing

pavbhaji bites, target, pavbhaji recipe, pav bhaji snacks, leftover pavbhaji, bhaji pav, mumbai street food, instast snack
Method:
1) Cut French bread into 1-inch pieces. Put them into a container and keep the lid little open. It will make bread little crisp.
pavbhaji bites, target, pavbhaji recipe, pav bhaji snacks, leftover pavbhaji, bhaji pav, mumbai street food, instast snack
2) Arrange 7-8 bread pieces on oven safe baking trey. Spread 1 tbsp Pavbhaji on each bread piece. Sprinkle little shredded cheese.
3) Preheat oven on 350 F. Bake these Pavbhaji bites for 10-12 minutes or until cheese melts.
Garnish with chopped Cilantro and serve hot.
These pavbhaji bites are great Tea Time Snack.

Labels:
pavbhaji bites, Spicy Snacks, pavbhaji recipe, bhaji pav recipe, leftover recipe, party snacks, pavbhaji snacks, mumbai pavbhaji

Sunday, May 25, 2008

Bold Arabic Style Henna - Inner Arm Tattoo

Here is a new henna tattoo for one of my favorite clients. She loves bold decoration and chose to have an Arabic style design for her inner arm. This henna pattern uses dark, or thick lines to catch the eye, and just a few of the finer lines to give that wonderful intricate feeling.

This pattern took about 15 minutes to complete, and costs $15.00. It is a "Chef's Choice" design that is derived from the work of another very talented henna artist. It is often best to just point out the style of henna pattern you like & let your henna artist go from there. That way, you get a unique pattern that has the flavor you want, but fits your style and your budget.

It is important to know that this is a photo of the henna paste still on the arm. The final color will show up about 48 hours after the paste has been removed. Henna tattoo will always be some shade of red to reddish brown, depending in part on your skin type & how well you care for your design.

Women of color often get a wonderful black cherry red stain. I am hoping for a photo of the finished color... but you never know.

Thursday, May 22, 2008

मसूर उसळ - Masoor Usal

Masoor Usal (Egnlish Version)

masoorachi usal, masoor usal, lentils, legumes, Lentil curry, hot curry recipe, new york style curry, healthy food, quick recipe
साहित्य:
१ वाटी मसूर
१ कांदा
१/४ कप ओलं खोबरं
फोडणीसाठी : २ चमचे तेल,१/४ टिस्पून मोहोरी, १/४ टिस्पून हिंग, १/४ टिस्पून हळद, १ टिस्पून लाल तिखट
२-३ कढीपत्ता पाने
१-२ आमसुलं
१ टिस्पून साखर
मीठ
चिरलेली कोथिंबीर

कृती:
१) १ वाटी मसूर रात्रभर पाण्यात भिजवावे. पाणी काढून टाकावे व सुती कापडात मोड येण्यासाठी १०-१२ तास गच्चं बांधून ठेवावेत.
२) नंतर कांदा बारीक चिरून घ्यावा. कढईत २-३ चमचे तेल गरम करावे. मोहोरी, हिंग, हळद, लाल तिखट घालून फोडणी करावी. कढीपत्ता घालावा, खवलेला नारळ घालावा, कांदा फोडणीस घालावा. मीठ घालावे.
३) कांदा परतावा. कांदा परतला गेला कि मग मोड आलेले मसूर आणि आमसुल घालावे. मध्यम आचेवर मसूर वाफेवरच शिजवावे, पाणी घालू नये. मधेमधे ढवळावे. साखर घालावी. मसूर वाफेवर छान शिजले कि कोथिंबीर घालावी.
गरम गरम पोळीबरोबर मसूराची उसळ सर्व्ह करावी.

टीप:
१) जर वातावरण फार थंड असेल तर भिजवलेल्या कडधान्याला मोड लगेच येत नाहीत. अशावेळी मसूर सुती कापडात गच्चं बांधून घ्यावेत. ओव्हन २ मिनीटं प्रिहीट करावा. ओव्हन off करावा आणि बांधलेले मसूर ओव्हनमध्ये ठेवावे. काही तासांनी व्यवस्थित मोड येतात. इतर कोणतेही कडधान्य असेल त्यांनासुद्धा अशाच पद्धतीने मोड काढता येतात.

Labels:
Masoor Usal, Maharashtrian Masoor Usal Recipe, Lentils

Masoor Usal

Masoor Usal

Ingredients:
½ cup Masoor (whole brown lentils)
1 medium onion
¼ cup fresh grated Coconut
For tempering: 2 tsp Oil, ¼ tsp Mustard Seeds, ¼ tsp Asafoetida Powder, ¼ tsp Turmeric Powder, 1 tsp Red chili Powder
2-3 Curry leaves
1-2 Kokum
1 tsp Sugar
Salt to taste
2 tbsp chopped cilantro for garnishing

masoorachi usal, masoor usal, lentils, legumes, Lentil curry, hot curry recipe, new york style curry, healthy food, quick recipe
Method:
1) Soak ½ cup Masoor overnight in water. Drain and put them into clean cotton cloth. Hold all the edges of cloth and tie tightly. Keep it in warm place, atleast for 10-12 hours.
2) After Masoor gets sprouted, finely chop onion. Heat 2 tsp oil in a wok, add Mustard seeds, Asafoetida Powder, Turmeric Powder, Red chili Powder, 2-3 Curry leaves and grated coconut. Then add chopped onion. Add salt.
3) Stir fry onion till it becomes translucent. Then add Sprouted Masoor and Kokum. Cover the wok with lid. Keep the heat on medium. Do not add water. let the Masoor cook on steam. Sauté in between. Add sugar.
4) Once masoor are done, garnish with cilantro. Serve hot with Chapati.

Note:
1) If you climate is cold, it coul slow down the sprouting process. Then just preheat the oven for 2 minutes. Turn off the oven and Put the tied masoor in the oven. It will keep Masoor warm and make them sprout.

Tuesday, May 20, 2008

चॉकलेट वडी - Chocolate Vadi

Chocolate Vadi (English Version)

आपण बाजारात मिळणारे चॉकलेट बर्‍याचदा खातो. हि घरगुती चॉकलेट वडीची कृती..

Chocolate, premium Chocolate,gormet chocolate, fudge, hot chocolate, milk grated chocolate,chese chocolate, sweedish chocolate, light desserts, homemade desert
साहित्य:
१/२ कप कोको पावडर
१ कप मिल्क पावडर
१/४ कप लोणी / अनसॉल्टेड बटर
१/२ कप साखर
१/४ कप पाणी

कृती:
१) एका बोलमध्ये कोको पावडर आणि मिल्क पावडर एकत्र करून चाळून घ्यावी.
२) पोळपाटाला लोणी लावून घ्यावे. लाटण्यालासुद्धा लोणी लावून घ्यावे.
३) साखरेचा गोळीबंद पाक करावा. पॅन गॅसवरून उतरवावा लगेच त्यात लोणी घालावे, घोटावे. लगेच मिक्स्ड पावडर घालावी. जोरजोरात घोटत राहावे. पावडरची गोळी राहू देवू नये. याचे घट्टसर तुकतुकीत असे मिश्रण तयार होईल.
४) मिश्रण निवायच्या आत पोळपाटावर पसरावे. लाटण्याने समान लाटावे. १ सेमी उंचीचा थर बनवावा. सुरीने हलक्या हाताने वड्या पाडाव्यात. मिश्रण सुकले कि वड्या वेगवेगळ्या कराव्यात.
सजावटीसाठी काजू तुकडा किंवा बदामाचे काप घालावेत.

टीप:
१) पाक बनवताना, पावडर मिक्स करताना वेळेची काळजी घ्यावी. जर पाक जास्त घट्ट झाला किंवा लोणी कमी पडले तर वड्यांचे मिश्रण मोकळे होते आणि वडी पडत नाही. त्यामुळे सर्व जिन्नस आधीपासून तयार ठेवावे.
२) मिल्क पावडर एकदम पिठासारखी असावी. काही ठिकाणी किंचीत दाणेदार पावडर मिळते. यामुळे वड्यांच्या चवीत फरक पडतो. वड्या थोड्या चरचरीत लागतात.
३) जर वातावरण थंड असेल तर हे मिश्रण पटकन आळते. जर मिश्रण फळफळीत झाले तर थोडा वेळ मिश्रण गॅसवर ठेवावे आणि थोडे लोणी घालावे. चांगल्याप्रकारे घोटून मिक्स करावे व लगेच पोळपाटावर लाटून वड्या पाडाव्यात.

Labels:
Chocolate Wadi, Homemade Chocolate, Chocolate Recipe

chocolate Vadi

Chocolate Wadi

Ingredients:
½ cup Coco Powder
1 cup Milk Powder
¼ cup Unsalted Butter
½ cup Sugar
¼ cup water
Almond pieces for decoration

Chocolate, premium Chocolate,gormet chocolate, fudge, hot chocolate, milk grated chocolate,chese chocolate, sweedish chocolate, light desserts, homemade desert

Method:
1) Sift Coco Powder and Milk Powder together.
2) Grease Polpat or Pizza board and rolling pin with butter.
3) Heat a pan. Add sugar and water in the pan to make sugar syrup. The syrup should be at the “soft-ball” stage (Goliband Pak). That means that when you drop a bit of it into cold water to cool it down, it will form a soft ball. If you remove the ball from water, it will flatten like a pancake after a few moments in your hand.
4) Once you get perfect consistency of sugar syrup, remove the pan from heat. Immediately add butter and stir fast in one direction. Immediately add sifted powder. Stir continuously. There should not be any lumps. It will create shiny thick mixture.
5) Quickly pour this mixture on Polpat/ pizza board and roll this mixture evenly. Make a 1 cm layer. Gently cut it in 2 inch square with knife. Once the mixture is cool, separate the pieces.
6) Decorate with thin almond pieces.

Note:
1) Sugar syrup should be of perfect consistency. If sugar syrup becomes thick or if you used less butter then the mixture will become dry.
2) Milk powder should be very fine. Some milk powders are little granulated. It could reduce the taste of chocolate.
3) If the weather is cold, the mixture gets dry very soon. If it happened, then put the mixture on heat and add little butter. Stir fast and pour the mixture on Polpat/ pizza board. Roll and make chocolate pieces as per the above method.

Labels:
Chocolate Wadi, Homemade Chocolate, Chocolate Recipe

Friday, May 16, 2008

Inspiration! Arabic Henna Pattern for the Leg

I am so inspired by this fantastic (unknown) ARTIST on You Tube that I had to try a five minute design. To the left is the result.

Of course the advantage of free-style, anything I want to do henna - a.k.a. Chef's Choice - is that I can just draw. I used my regular plastic cone, but did tape the end to a finer, and more firm point. I like this improvement. I also notice that in many of the videos, the artists are working with a wetter paste than I bring to Midnight Sun. The advantage of the wet pastes is deeper penetration of color and finer lines. However, a wet paste makes for a longer dry time, and requires that a client be a bit more mindful of the artwork. Now always easy in our car culture.

I was inspired by some HOW TO ROLL HENNA CONES Videos from You Tube once again, and if you click the links, you can go get some inspiration as well.

Of course I also found more great art.. patterns I would really like to be able to do here in town. If you check out this VIDEO.. you will see that henna on the hands is a good thing! Of course you don't have to order the full bridal images you see, but I am looking for practice volunteers who have some free hours, and a driver, to polish up my bridal skills.

Thursday, May 15, 2008

Henna Tattoo for the Lower Back

It's summer time here in Florida, and we are starting to tattoo the lower back. This bold pattern is taken once again from the "Sangeet" pattern book by Neeta Sharma available on line at Tap Dancing Lizard.

Her bold designs are very popular for henna parties. Her henna patterns offer the traditional feeling of henna in bold lines that are visually very compelling.

For lower back tattoo, be sure to wear a crop top and low rider pants so that there is plenty of room for your design. It is also important to let the design get good and dry before going out into the afternoon heat as too much sweating can cause a design to "melt" or to run if the paste is not sufficeintly dry.

I would love to see you all when I return to Midnight Sun on Saturday, May 24th. Please feel welcome to visit Spirit Vision Henna for henna tattoo photo galleries & more information.

वरी तांदूळाची खांडवी - Vari Tandul Khandavi

Upavasachi Khandvi (English Version)

Chinese, Fasting Food, Indian Food, Indian Cuisine, Religious Food, Rice Recipe, Small grain Rice Recipe, Healthy Food, Weight Loss
साहित्य:
१/२ कप वरी तांदूळ
१/२ कप किसलेला गूळ
दिड कप पाणी
२ चमचे तूप
१ लहान चमचा वेलची पूड
१/४ कप ओले खोबरे

कृती:
१) वरी तांदूळ पाण्याखाली धुवून निथळत ठेवावा. सर्व पाणी निघून जावू द्यावे.
२) पातेल्यात २ चमचे तूप गरम करून त्यावर हे तांदूळ थोडे भाजून घ्यावे. दुसर्‍या पातेल्या दिड कप पाणी उकळत ठेवावे.
३) भाजलेल्या तांदूळात उकळलेले पाणी घालून ढवळावे १-२ वेळा वाफ काढावी. कधी कधी तांदूळ सर्व पाणी शोषून कोरडे होतात त्यामुळे थोडे पाणी वाढवावे लागते. त्याची काळजी घ्यावी. वरी तांदूळ निट शिजले आहेत कि नाही हे चव घेऊन बघावे.
४) तांदूळात पाणी शोषले गेले कि गूळ, नारळ आणि वेलचीपूड घालावी व ढवळावे. १-२ वेळा वाफ काढावी. तूप लावलेली थाळी तयार ठेवावी. मिश्रण दाटसर झाले कि थाळीत घालून थापावे व १ सेंमी चा थर करावा.
वरून खवलेला नारळ घालावा व वड्या पाडाव्यात.

Labels:
Khandavi Recipe, Sweet Khandavi, Vari Tandul Khandavi, Bhagar khandavi, vari tandool khandavi

Upavasachi Khandvi

Upavasachi Khandvi in Marathi

Very Delicious Indian Fasting Food Item.

Ingredients:
½ cup Vari Tandul (Samo)
½ cup Grated Jaggery
1½ cup Water
2 Tsp Pure Ghee
1 Tsp Cardamom Powder
¼ cup Fresh Grated Coconut

Chinese, Fasting Food, Indian Food, Indian Cuisine, Religious Food, Rice Recipe, Small grain Rice Recipe, Healthy Food, Weight Loss
Method:
1) Wash vari tandul with water. Drain.
2) Take a heavy bottom pan. Heat 2 tsp ghee in it. Add washed Vari Tandul and stir till color turns to light pink (?) or for 2-3 minutes.
3) In other pan, heat 1½ cup water. Add hot water in roasted Vari Tandul. Give a nice stir and cover it with lid. Sometimes, Vari tandul absorb all the water and becomes dry. We want moist mixture. If it becomes dry, you need to add little hot water. Taste little vari tandul to check whether it’s cooked properly.
4) Once Vari Tandul absorbs all the water, add grated jaggery, grated coconut and Cardamom Powder. Mix well and remove all the lumps. Turn the heat on medium. Cover the pan with lid and let it cook for few minutes.
5) Grease a stainless steel plate with little ghee. Pour all the mixture in the plate and spread evenly to make 1 cm layer.
Sprinkle grated coconut on it and Cut into 2 inch pieces.

Labels:
Khandavi Recipe, Sweet Khandavi, Vari Tandul Khandavi, Bhagar khandavi, vari tandool khandavi

Tuesday, May 13, 2008

कुळथाचे कळण - Kulathache kalan

Kulathache Kalan (English Version)

कुळथाची उसळ बनवण्यासाठी कुळीथ शिजवून घ्यावे लागतात. कुळीथ शिजवल्यावर उरलेल्या पाण्यापासून चवदार कळण बनवता येते, त्याची हि कृती

Kulith Kalan, Horsegram recipe, Kulathache Kalan, healthy recipe, heart healthy food, soup recipe, indian soup recipe

साहित्य:
१ वाटी कुळीथाचे पाणी
(कुळीथ शिजवून उरलेले पाणी)
१ वाटी आंबट ताक
१ हिरवी मिरची
१/२ टिस्पून साजूक तूप
१/४ टिस्पून जिरे
चिमूटभर हिंग
मीठ
१ चमचा चिरलेली कोथिंबीर

कृती:
१) एका पातेल्यात कुळथाचे पाणी घ्यावे. मध्यम आचेवर कोमट करावे. नंतर त्यात तयार ताक घालावे.
२) मिरची चिरावी व थोडे मिठ घालून चुरडून घ्यावी. चुरडलेली मिरची कुळथाच्या पाण्यात घालावी. चवीनुसार मिठ वाढवावे.
३) लहान कढल्यात तूप गरम करून जिरं, हिंग घालून फोडणी करावी. कोमटसर कुळथाच्या पाण्याला हि फोडणी वरून घालावी व पिण्याइतपतच गरम करावे. खुप गरम करू नये.
४) कोथिंबीर घालावी. हे कळण नुसते प्यायला आणि भाताबरोबरही छान लागते.

टीप:
१) आवडत असल्यास फोडणीत कढीपत्ता घालू शकतो.

Labels:
Kulathache Kalan, Horse Gram Soup, Soup Recipe, Maharashtrian Soup Recipe, Kulith Kalan

Kulathache Kalan

Kulathache Kalan

Ingredients:
1 cup Cooked Kulith (Horse gram) Stock
(Excessive water from Cooked Kulith)
1 cup Sour Butter milk
1 Green Chili
1/2 Tsp Ghee
1/4 Tsp Cumin seeds
Pinch of Asafoetida Powder
Salt to taste
1 tbsp chopped Cilantro

Kulith Kalan, Horsegram recipe, Kulathache Kalan, healthy recipe, heart healthy food, soup recipe, indian soup recipe
Method:
1) In a saucepan, take Horse gram stock. On low heat, make it lukewarm. Then add Buttermilk to it.
2) Finely chop green chili. Crush green chili coarsely with salt. Put crushed chili into Kulith Stock and add more salt if needed.
3) In small saucepan, heat 1/2 tsp ghee. Add Cumin seeds and asafoetida powder. Put this tadka to Horse gram stock. Do not heat much. Kalan is served at warm temperature and not hot.
4) Sprinkle chopped Cilantro. Serve as soup or with rice.

Note:
1) Add 2-3 curry leaves to enhance the taste of Kalan.

Labels:
Kulathache Kalan, Horse Gram Soup, Soup Recipe, Maharashtrian Soup Recipe, Kulith Kalan

Sunday, May 11, 2008

Henna for the Back of the Hand from

henna tattoo back of hand

It's always wonderful to henna the hands. This is a photo of a design from Saturday henna in Five Points. Once again, the "Sangeet" pattern book proves popular, and this pattern is a reduction of a more complex design.

I started working farthest from the tips of the fingers, and drew the defining lines for the cuff portion of the pattern first. I then drew the little leaf jewel at the top of the the cuff before filling in the band. To do this, I first made the bold semi-circles that define the look of the inner band, then went back to fill them in.

I finished filling in the band, went back & did the embellishments on the leaf, and then moved to draw the pattern on the back of the hand. I drew the spiral portion of the tattoo (farthest from the thumb)filled that is, and finally drew and finished the larger paisley.

My paste for the day was a bit wet, so very easy to work with, but slow to dry. This year, perhaps because of the addition of a bit more pomegranate concentrate when making the paste, the paste is very easy to work with, but will run if not completely dry before going out into the sun... particularly if the lines are bold, or if you choose to have several applications of the lemon sugar glaze.

Thursday, May 8, 2008

Let your henna dry first.. then gild it.

gilded henna tattoo

Here is a photo of a gilded henna tattoo. This is also an example of the "Chef's Choice" option, which means you give me your hand, tell me how much you want to spend, and wait to see the result.

I realized again on Saturday that because I am familiar with henna and the process of gilding, that I may not always give a complete explanation to new customers. For that reason, I will now go over some basics. If this is old news to you.. please forgive.

The dark colored lines you see in the picture are of henna paste that has dried, been glazed with lemon sugar, and is "stuck" onto the skin. This dried paste is not the finished tattoo. Under the paste, henna is interacting with your skin to stain it some shade of red to reddish brown. The finished color of your tattoo will develop over the next two days. The initial color you see when the paste is removed will darken.

The other colors you see in the photo (click the photo for a larger image) are very temporary.. they will only last a day. The process of adding these temporary body paints is called gilding. If you want your henna tattoo gilded, there is no extra charge. There is extra drying time. It is very important that the henna paste (the darker lines) dries before the gilding is added. The gilding colors are made with cosmetic powders and glitters in a carrier base that is made of hair setting gel. This gel is a liquid, and can blur the henna tattoo if applied to early.

Now, if you are new to henna, it is important to remember that you must let your henna tattoo dry before becoming active. Failure to do so results is a smudged or running tattoo.. particularly if you spill a beverage on the design!!! Touch ups are sometimes possible, sometimes.. not so possible, but if you do need one during the henna party, you may have to wait until I have finished the tattoo I am working on.

Sometimes, hennas are smudged long after you've left the shop & a repair is not possible. Should this happen, no worries. Just remove all the henna paste from your skin, apply a vegetable oil.. and wait for the color to develop over the next few days. More information as well as FAQ are online at spiritvisionhenna.com

कुळीथ उसळ - Kulith Usal

Kulith Usal (English Version)


साहित्य:
पाउण वाटी कुळीथ
फोडणीसाठी:
२ चमचे तेल, १/२ टिस्पून मोहोरी, १/२ टिस्पून जिरे, चिमूटभर हिंग, १/२ टिस्पून हळद, १ टिस्पून तिखट
१ ते दिड चमच गोडा मसाला
२-३ आमसुलं
सुपारीएवढा गूळ
मीठ
कोथिंबीर

कृती:
१) पाउण वाटी कुळी रात्रभर पाण्यात भिजत घालावेत (किमान १०-१२ तास). नंतर ते उपसून निथळत ठेवावेत. भिजलेले कुळीथ स्वच्छ पंचामध्ये मोड येण्यासाठी किमान ७-८ तास घट्ट बांधून उबदार ठिकाणी ठेवावेत.
२) कूकरच्या तळाला २ भांडी पाणी घालावे. मोड आलेले कुळीथ कूकरच्या डब्यात घ्यावेत. त्यात दुप्पट पाणी घालावे व कुळीथ शिजवून घ्यावे. कूकरच्या खुप शिट्ट्या करू नये. कुळीथ जास्त प्रमाणात शिजू देवू नये, कुळीथ अख्खे राहिले पाहिजेत.
३) शिजलेले कुळीथ व पाणी वेगवेगळे करावे. या पाण्याचे कळण करता येते.
४) कढईत २ चमचे तेल गरम करावे. त्यात मोहोरी, जिरे, हिंग, हळद, लाल तिखट घालून फोडणी करावी. शिजलेले कुळीथ फोडणीस टाकावे. सावकाशपणे ढवळून मिठ, गोडा मसाला आणि आमसुल घालावे. मध्यम आचेवर १ वाफ काढावी. नंतर त्यात गूळ घालावा. गरज पडल्यास किंचीत पाणी घालावे व एक उकळी काढावी.

Labels: Kulith Usal, Horsegram Usal, Kulathachi Usal

Kulith Usal

Kulith Usal

Ingredients:
½ cup Kulith (Horse gram)
For Tempering:
2 tbsp Oil
½ tsp Mustard Seeds
½ tsp Cumin seeds
Pinch of Asafoetida powder
½ tsp Turmeric Powder
1 tsp Red Chili Powder
1 tbsp Goda Masala (Maharashtrian Masala)
2-3 Kokum
1tbsp Jaggery
Salt to taste
Cilantro for garnishing


Method:
1) Soak ½ cup Kulith overnight in the water (atleast 10 hours). Drain. For sprouting, put drained Kulith in a clean cotton cloth. Cover and tie tightly and place it in warm conditions (7-8 hours).
2) In a pressure cooker, add 2-3 cups of water. Put sprouted Kulith in a steel container inside the pressure cooker. Add water in that container (For 1 cup Kulith, use 2 cups of water). Do not over cook i.e. cooked kulith should remain whole and not broken.
3) Once pressure cooker cools down, drain all water from kulith and save it for later. It can be used to make Kalan, Maharashtrian Kadhi.
4) Heat 2 tbsp oil in saucepan . Temper with mustard seeds, Cumin Seeds, Asafoetida Powder, Turmeric Powder, Red Chili powder. Then add cooked Kulith and stir gently. Add salt, Goda Masala, and Kokum. Turn the heat on medium. Cover the pan for 1 minute. Then add Jaggery at the end. Add little water if needed. Bring it to boil for a couple of minutes on medium heat. Garnish with chopped Cilantro.
Serve hot with Wheat Chapati

Labels:
Kulith Usal, Horse Gram Usal, Kulathachi Usal.

Tuesday, May 6, 2008

भोपळ्याच्या पुर्‍या - Bhoplyachya Purya

Bhopalyachya Purya (English Version)

भोपळ्याच्या पुर्‍या २-३ प्रकारे करता येतात. त्यातील एक पद्धत मी पुढे देत आहे.

healthy recipe, Chinese, Mexican Food, Thai recipes, Low calorie diet, Diet recipe, Low cholesterol recipe, reduce fat
साहित्य:
२ कप भोपळ्याच्या बारीक फोडी (साले काढून)
१ कप किसलेला गूळ
कणिक
१ चमचा तेल
तळण्यासाठी तेल

कृती:
१) भोपळ्याच्या फोडी कूकरमध्ये शिजवून घ्याव्यात. कूकरमध्ये पाणी घालावे. कूकरच्या डब्यात फोडी घालाव्यात, डब्यात पाणी घालू नये. डब्याला वरती एक ताटली ठेवावी ज्यामुळे पाणी आत जाणार नाही व फोडी वाफेवर शिजतील.
२) कूकरची वाफ मुरली कि फोडी असलेला डबा बाहेर काढावा. फोडी गरम असतानाच त्यात गूळ घालावा व घोटावे. यासाठी गॅस लावण्याची गरज नाही भोपळ्याच्या फोडी व्यवस्थित शिजल्या असतील तर मिश्रण छान एकजीव होते.
३) मिश्रण पातळ झाले कि त्यात भिजेल इतपत कणिक घालावी व पोळ्यांसाठी भिजवतो इतपत घट्ट असावी. १-२ चमचे तेल घालून मळावे. मिश्रण थोडावेळ झाकून ठेवावे.
४) तळण्यासाठी तेल गरम करावे. पुर्‍या लाटाव्यात व गुलाबीसर रंगावर तळून काढाव्यात.

Labels:
Bhopla Puri, Pumpkin Puri, Pumpkin Sweet Puri, Pumpkin recipe, Bhopala recipe, Gharge

Bhoplyachya Purya

Pumpkin Puris

Ingredients:
2 cups small cubes of pumpkin (peeled)
1 cup grated Jaggery
Whole wheat Flour
1 tbsp Oil
Oil for deep frying


healthy recipe, Chinese, Mexican Food, Thai recipes, Low calorie diet, Diet recipe, Low cholesterol recipe, reduce fatMethod:
1) In a pressure cooker, put 1 ltr water. Put pumpkin cubes in steel container inside pressure cooker without adding water. Place a steel plate on that container to prevent water dripping inside the container. And pumpkin will cook on steam. Pressure cook pumpkin up to 2-3 whistles.
2) Let the cooker cool down for 10-15 minutes. Mash pumpkin cubes while they are hot, add jaggery and mash. You will get thick and fine mixture.
3) Then add enough wheat flour and knead well and make nice dough. Add 1-2 tbsp oil and knead well. Consistency for dough should be medium. Cover dough for some time.
4) Make marble sized balls out of the dough and make puris. In a deep fryer, heat enough oil for deep frying puris. Deep fry puris till it turn to golden brown color.

Chakali

Bhopla puri, Pumpkin Puri, Pumpkin Sweet puri, Pumpkin Recipe, Bhopala Recipe, gharge

Sunday, May 4, 2008

Shaded Henna Tattoo - Original Henna Pattern for the Leg

Here is a photo of an original "wrap-around" henna tattoo pattern for the leg.

I am experimenting with different ways to create a shaded effect with henna paste. For this design I used henna paste, thinned with lemon juice & sugar that I brushed onto the skin. I used a little water color brush to fill in finished design areas.

It is my hope that this gentle touch of henna stain will result in a lighter color in the finished henna tattoo for the shaded areas. Perhaps I will to be able to post a photo of the finished color next week. Notice that this is a pic of the henna paste ON the skin, not black henna and not the finished color. If you have a photo of henna we have created together, please feel welcome to email it to me & I will post it with your photo of paste on the skin.

For more photos of henna tattoo for the legs & ankles, please be sure to visit the updated gallery on line at Spirit Vision Henna. Henna Tattoo is available on Saturday afternoons from 1:00 until about 5:15 on Saturdays through out the summer. Of course we are available for out calls, parties & corporate events.. but the weekend party is good fun.

* If you are coming for your first henna experience, please be sure to read the informed consent carefully. I may not have made it clear that henna paste goes on the skin wet. It is important to be mindful of your tattoo for the first 15 minutes or so after the paste is applied. If you choose to have the lemon sugar glaze, then it may take a bit longer for the paste to dry.

Also, if you are going to have an active day, then it is best NOT to put henna on jointed areas! More complete information is available on my FAQ page... and of course all over the web!